CI/CD Pipeline using Circleci.


The article assumes there is an already working app to be deployed.
Prerequisites:
Before you get started, you’ll need to have the following:
A GitHub account, which you can make at the GitHub website.
One Ubuntu 22.04 server, including a sudo non-root user and a firewall.
A CircleCI account, which you can make at the CircleCI website.
Step 1 - Adding a config file to your project
CircleCI executes workflows according to a configuration file in your project folder. In this step, you will create that file to define the deployment workflow.
Create a folder called .circleci in the root directory of your project and add a new file called config.yml in it:
mkdir .circleci
touch .circleci/config.yml
Add the following configuration to the new config.yml file:
version: 2.1

# Define the jobs you want to run for this project
jobs:
    dev:
        docker:
            - image: cimg/base:2021.04
        steps:
            - checkout
            - run: ssh -oStrictHostKeyChecking=no -v $USER@$IP "./test/dev-resume_deploy.sh"
    staging:
        docker:
            - image: cimg/base:2021.04
        steps:
            - checkout
            - run: ssh -oStrictHostKeyChecking=no -v $USER@$IP "./test/staging-resume_deploy.sh"
    prod:
        docker:
            - image: cimg/base:2021.04
        steps:
            - checkout
            - run: ssh -oStrictHostKeyChecking=no -v $USER@$IP "./test/prod-resume_deploy.sh"

# Orchestrate our job run sequence
workflows:
 version: 2
 dev-staging-prod:
  jobs:
   - dev:
      filters:
       branches:
        only:
         - main
   - hold:
          type: approval
          requires:
            - dev
   - staging:
          requires:
            - hold
   - final-hold:
          type: approval
          requires:
            - staging
   - prod:
          requires:
            - final-hold
Save this file and exit the text editor.
Next, you will commit and push these files to a GitHub repository. You will do this by running the following commands from the project directory.
git add .
git commit -m "commit message"
git push -u origin main
Step 2 - Creating a New User for Deployment
Now that you have the project ready, you will create a deployment user in the VPS(Ubuntu 22.04).
Connect to your VPS as your sudo user
ssh your_username@your_server_ip
Next, create a new user that doesn’t use a password for login using the useradd command.
sudo useradd -m -d /home/circleci -s /bin/bash circleci
This command creates a new user on the system. The -m flag instructs the command to create a home directory specified by the -d flag.
circleci will be the new deployment user in this case. For security purposes, you are not going to add this user to the sudo group, since the only job of this user, is to create an SSH connection from the VPS to the CircleCI network and run the deploy.sh scripts.
You now need to create an SSH key, which the new user can use to log in. You are going to create an SSH key with no passphrase, or else CircleCI will not be able to decrypt it. Also, CircleCI expects the format of the SSH keys to be in the PEM format, so you are going to enforce that while creating the key pair.
Back on your local system, move to your home folder:
cd ~
ssh-keygen -m PEM -t rsa -f .ssh/circleci
This command creates an RSA key with the PEM format specified by the -m flag and the key type specified by the -t flag. You also specify the -f to create a new key pair called circleci and circleci.pub. Specifying the name will avoid overwriting your existing id_rsa file.
Print out the new public key:
cat ~/.ssh/circleci.pub
This outputs the public key that you generated. You will need to register this public key in your VPS. Copy this to your clipboard.
Back on the VPS, create a .ssh directory for the circleci user:
sudo mkdir /home/circleci/.ssh
Here you’ll add the public key you copied from the local machine into a file called authorized_keys:
sudo nano /home/circleci/.ssh/authorized_keys
Add the copied public key here, save the file, and exit the text editor.
Give the circleci user its directory permissions so that it doesn’t run into permission issues during deployment.
sudo chown -R circleci:circleci /home/circleci
Verify if you can log in as the new user by using the private key. Open a new terminal on your local system and run:
ssh circleci@your_server_ip -i ~/.ssh/circleci
You will now log in as the circleci user into your VPS. This shows that the SSH connection is successful. Next, you will connect the GitHub repo to CircleCI.
Step 4 — Adding Your GitHub Project to CircleCI
In this step, you’ll connect your GitHub account to your CircleCI account and add the project for CI/CD. If you signed up with your GitHub account, then your GitHub will be automatically linked with your CircleCI account. If not, head over to https://circleci.com/account and connect it.
To add the project, navigate to your CircleCI project dashboard at https://app.circleci.com/projects/project-dashboard/github/your_username:

Here you will find all the projects from GitHub listed. Click on Set Up Project for the project. This will bring you to the project setup page:
You’ll now have the option to set the config for the project, which you have already set in the repo. Since this is already set up, choose the Use Existing Config option. This will bring up a popup box confirming that you want to build the pipeline:
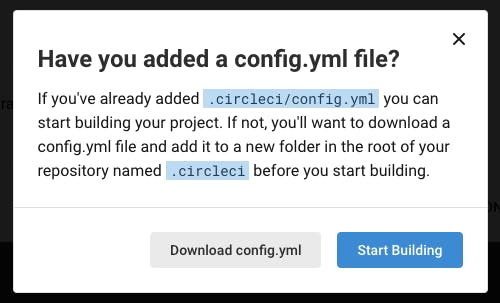
From here, go ahead and click on Start Building. This will bring you to the project pipeline page. For now, this pipeline will fail. This is because you must first update the SSH keys for your project.
Navigate to the project settings at https://app.circleci.com/settings/project/github/[your-username]/[your-project] and select the SSH keys section on the left.
Retrieve the private key named circleci you created earlier from your local machine by running:
cat ~/.ssh/circleci
Copy the output from this command.
Under the Additional SSH Keys section, click on the Add SSH Key button.

This will open up a window asking you to enter the hostname and the SSH key. Enter a hostname of your choice, and add in the private SSH key that you copied from your local environment.
CircleCI will now be able to log in as the new circleci user to the VPS using this key.
The last step is to provide the username and IP of the VPS to CircleCI. In the same Project Settings page, go to the Environment Variables tab on the left:

Add an environment variable named USER with a value of circleci and IP with the value of the IP address of your VPS (or domain name of your VPS, if you have a DNS record).
Once you’ve created these variables, you have completed the setup needed for CircleCI. Next, you will give the circleci user access to GitHub via SSH.
Step 5 — Adding SSH Keys to GitHub
You now need to provide a way that the circleci user can authenticate with GitHub so that it can perform git operations like git pull.
To do this, you will create an SSH key for this user to authenticate against GitHub.
Connect to the VPS as the circleci user:
ssh circleci@your_server_ip -i ~/.ssh/circleci
Create a new SSH key pair with no passphrase:
ssh-keygen -t rsa
Then output the public key:
cat ~/.ssh/id_rsa.pub
Copy the output, then head over to your circleci-test GitHub repo’s deploy key settings at https://github.com/[your-username]/[your-project]/settings/keys.
Click on Add deploy key to add the copied public key. Fill the Title field with your desired name for the key, then add the copied public key in the Key field. Finally, click the Add key button to add the key to your account.
Now that the circleci user has access to your GitHub account, you’ll use this SSH authentication to set up your project.
Step 6 — Setting Up the Project on the VPS
Now for setting up the project, you are going to clone the repo and make the initial setup of the project on the VPS as the circleci user.
On your VPS, run the following command:
git clone git@github.com:[your-username]/[your-project].git
You will also need to provide the deployment instructions. These commands will run every time the circleci user deploys the code.
Head back to the home directory since that will be the path the circleci user will land in during a successful login attempt:
cd ~
Go ahead and create the deploy.sh files, which will contain the deployment instructions.
For example this dev-resume_deploy.sh file contains the code for deploying the resume webapp to the dev environment.
nano dev-resume_deploy.sh
You will now use Bash script to automate the deployment:
#!/bin/bash
cd ~/test
cd dev_resume
git pull origin main
docker build -f Docker/dev_dockerfile -t 634351692633.dkr.ecr.us-east-1.amazonaws.com/dev-resume:latest .
docker push 634351692633.dkr.ecr.us-east-1.amazonaws.com/dev-resume:latest
docker pull 634351692633.dkr.ecr.us-east-1.amazonaws.com/dev-resume:latest
docker stop dev-resume
docker rm dev-resume
docker run -dp 9000:80 --name dev-resume 634351692633.dkr.ecr.us-east-1.amazonaws.com/dev-resume:latest
This will automatically go into the project directory, navigate into the file containing the dev version of the app, pull the latest update from GitHub, build a docker file and tag with the AWS ECR location tag, push the tagged image to ECR to save it, and then pull the saved image. The previous running container is stopped and removed respectively before a new container is started with the latest tagged image.
Make this file an executable by running:
chmod u+x dev-resume_deploy.sh
Now head back to your local machine and make a quick change to test it out.
This will trigger a new pipeline for deployment. Navigate to https://app.circleci.com/pipelines/github/[your_username] to view the pipeline in action.
Conclusion:
These are the steps to integrate CircleCI with your GitHub repository and Linux-based VPS. You can modify the deploy.sh for more specific instructions related to your project.